http://www.wikio.fr WebSphere And Tivoli Tricks: May 2011

Friday, May 20, 2011

Basic Jython script to install an ear file

The script below will install on a local server. If Administrative security is on, then it will prompt for authentication.

#install the application
AdminApp.install('D:/workspace/java/jsfks/deploy/jsfks.ear', '[ -nopreCompileJSPs -distributeApp -nouseMetaDataFromBinary -nodeployejb -appname jsfks_test_ear -createMBeansForResources -noreloadEnabled -nodeployws -validateinstall warn -noprocessEmbeddedConfig -filepermission .*\.dll=755#.*\.so=755#.*\.a=755#.*\.sl=755 -noallowDispatchRemoteInclude -noallowServiceRemoteInclude]' );
#save
AdminConfig.save();

Wednesday, May 18, 2011

Jython script to show WebSphere Application Server Cluster Status

Sample usage in unix:
wsadmin.sh -lang jython -f ./show_cluster_status.py <clusterName>
-----------------------------------------------------------------
possible improvement would be to check that cluster exists and that
a cluster name has been passed is as a command line paramter.
-----------------------------------------------------------------
i = 0
clusterName = sys.argv[i]
clusterId = AdminConfig.getid("/ServerCluster:"+clusterName+"/" )
print "ClusterName is: "+clusterName
if (len(clusterId) != 0):
clusterObject = AdminControl.completeObjectName("type=Cluster,name="+clusterName+",*" )
clusterStatus = AdminControl.getAttribute(clusterObject, "state" )
print "clusterStatus="+clusterStatus
running = "websphere.cluster.running"
partialstart = "websphere.cluster.partial.start"
starting = "websphere.cluster.starting"
stopped = "websphere.cluster.stopped"
if (cmp(clusterStatus, starting) == 0):
print "starting"
sys.exit()
#endIf
if (cmp(clusterStatus, stopped) == 0):
print "stopped"
sys.exit()
#endIf
if (cmp(clusterStatus, running) == 0):
print "running"
sys.exit()
#endIf
if (cmp(clusterStatus, partialstart) == 0):
print "partialstart "
sys.exit()
#endIf

else:
print "Error"
#endElse

Tuesday, May 17, 2011

Jython script to list all AdminApp commands

result=AdminApp.help()
print result

---------------- RESULT ------------------

WASX7209I: Connected to process "server1" on node T60Node03 using SOAP connector; The type of process is: UnManagedProcess
WASX7095I: The AdminApp object allows application objects to
be manipulated -- this includes installing, uninstalling, editing,
and listing. Most of the commands supported by AdminApp operate in two
modes: the default mode is one in which AdminApp communicates with the
WebSphere server to accomplish its tasks. A local mode is also
possible, in which no server communication takes place. The local
mode of operation is invoked by bringing up the scripting client with
no server connected using the command line "-conntype NONE" option
or setting the "com.ibm.ws.scripting.connectionType=NONE" property in
the wsadmin.properties.

The following commands are supported by AdminApp; more detailed
information about each of these commands is available by using the
"help" command of AdminApp and supplying the name of the command
as an argument.

deleteUserAndGroupEntries
Deletes all the user/group information for all
the roles and all the username/password information for RunAs
roles for a given application.
edit Edit the properties of an application
editInteractive Edit the properties of an application interactively
export Export application to a file
exportDDL Export DDL from application to a directory
help Show help information

install Installs an application, given a file name and an option string.

installInteractive
Installs an application in interactive mode, given a
file name and an option string.
isAppReady Checks whether the application is ready to be run
list List all installed applications
listModules List the modules in a specified application
options Shows the options available, for a given file, application,
or in general.
publishWSDL Publish WSDL files for a given application
searchJNDIReferences
List application that refer to the given JNDIName on a given node
taskInfo Shows detailed information pertaining to a given install task
for a given file
uninstall Uninstalls an application, given an application name and
an option string
update Updates an installed application
updateAccessIDs Updates the user/group binding information with accessID
from user registry for a given application
updateInteractive Updates an installed application interactively
view View an application or module,
given an application or module name

Changing a Node name in WebSphere

To change the name of a given node, use the following wsadmin command:
AdminTask.renameNode(‘[-nodeName <existing_node_name> -newNodeName <new_node_name>]‘)
This updates the name of the node specified by the nodeName parameter to the name specified by the newNodeName parameter.
Here is an example:
I have a cell where I wish to change the name of the deployment manager's node to dmgrnode01 as opposed to node01
The jython script I created has:
AdminTask.renameNode('[-nodeName node01 -newNodeName dmgrnode01]')


I am running the script from the <was_install_root</bin folder and the command to run the script is
./wsadmin.sh -lang jython -f /root/scripts/changeNodeName.py

How to delete and re-add a federated node with different ports

./removeNode.sh -help
Usage: removeNode [-force] [-quiet] [-nowait] [-logfile <filename>]
[-replacelog] [-trace] [-username <username>] [-password <password>]
[-profileName <profile>] [-help]
An example could be that a node was federated with the wrong ports and you may want to remove the node to correctly federate with a port offset. Looking at the node configuration in the administrative client I have ports that are not in the rage I want.


Removing Node:
./removeNode.sh -profileName node01 -username wasadmin -password wasadmin
ADMU0116I: Tool information is being logged in file
/var/apps/was61/node61_01/profiles/logs/removeNode.log
ADMU0128I: Starting tool with the node01 profile
ADMU2001I: Begin removal of node: node61_01
ADMU0009I: Successfully connected to Deployment Manager Server:
dmgr61.webspheretools.com:10004
ADMU0505I: Servers found in configuration:
ADMU0506I: Server name: nodeagent
ADMU2010I: Stopping all server processes for node node61_01
ADMU0510I: Server nodeagent is now STOPPED
ADMU2021I: Removing all servers on this node from all clusters in the cell.
ADMU2014I: Restoring original configuration.
ADMU2017I: The local original configuration has been restored.
ADMU9990I:
ADMU0306I: Note:
ADMU2031I: Any applications that were uploaded to the cell61 cell configuration
during addNode using the -includeapps option are not uninstalled by
removeNode.
ADMU0307I: You might want to:
ADMU2032I: Use wsadmin or the Administrative Console to uninstall any such
applications from the Deployment Manager.
ADMU9990I:
ADMU9990I:
ADMU0306I: Note:
ADMU2033I: Any buses that were uploaded to the cell61 cell configuration during
addNode using the -includebuses option are not uninstalled by
removeNode.
ADMU0307I: You might want to:
ADMU2034I: Use wsadmin or the Administrative Console to uninstall any such
buses from the Deployment Manager.
ADMU2024I: Removal of node node61_01 is complete.

Re-adding the node with a port offset

./addNode.sh dmgr61.<your_domain.com> 10004 -profileName node01 -username wasadmin -password wasadmin
-startingport 11000
Result:
./addNode.sh dmgr61.webspheretools.com 10004 -profileName node01 -username wasadmin -password wasadmin -startingport 11000
ADMU0116I: Tool information is being logged in file
/var/apps/was61/node61_01/profiles/logs/addNode.log
ADMU0128I: Starting tool with the node01 profile
CWPKI0309I: All signers from remote keystore already exist in local keystore.
ADMU0001I: Begin federation of node node61_01 with Deployment Manager at
dmgr61.webspheretools.com:10004.
ADMU0001I: Begin federation of node node61_01 with Deployment Manager at
dmgr61.webspheretools.com:10004.
ADMU0009I: Successfully connected to Deployment Manager Server:
dmgr61.webspheretools.com:10004
ADMU0507I: No servers found in configuration under:
/var/apps/was61/node61_01/profiles/config/cells/node61_01/nodes/node61_01/servers
ADMU2010I: Stopping all server processes for node node61_01
ADMU0024I: Deleting the old backup directory.
ADMU0015I: Backing up the original cell repository.
ADMU0012I: Creating Node Agent configuration for node: node61_01
ADMU0014I: Adding node node61_01 configuration to cell: cell61
ADMU0016I: Synchronizing configuration between node and cell.
ADMU0018I: Launching Node Agent process for node: node61_01
ADMU0020I: Reading configuration for Node Agent process: nodeagent
ADMU0022I: Node Agent launched. Waiting for initialization status.
ADMU0030I: Node Agent initialization completed successfully. Process id is:
31996
ADMU9990I:
ADMU0300I: The node node61_01 was successfully added to the cell61 cell.
ADMU9990I:
ADMU0306I: Note:
ADMU0302I: Any cell-level documents from the standalone cell61 configuration
have not been migrated to the new cell.
ADMU0307I: You might want to:
ADMU0303I: Update the configuration on the cell61 Deployment Manager with
values from the old cell-level documents.
ADMU9990I:
ADMU0306I: Note:
ADMU0304I: Because -includeapps was not specified, applications installed on
the standalone node were not installed on the new cell.
ADMU0307I: You might want to:
ADMU0305I: Install applications onto the cell61 cell using wsadmin $AdminApp or
the Administrative Console.
ADMU9990I:
ADMU0003I: Node node61_01 has been successfully federated.


I could have used a ports definition file to specify actual ports, but you need to know all the port names required and takes time to set-up. In a large enterprise you would use a portsdef.props file.

WebSphere change Hostname

To change the host name for a given node, use the following wsadmin command:
AdminTask.changeHostName(‘[-nodeName <node_name> -hostName <new_host_name>]‘)

This updates the host name for the node specified in the nodeName parameter to the value specified in the hostName parameter.
These commands update all of the necessary WAS configuration, but do keep in mind they do not update any shell or batch files in the environment. This means you need to update the setupCmdLine script included in your WAS installation, and you obviously need to update any of your custom scripts that have hard coded values for cell, node, and host names.

Best way to log a WebSphere silent install

install -options "/opt/IBM/WebSphere/silentFiles/myresponsefile.txt" 
-silent -log # !/opt/IBM/WebSphere/myOptionFiles/log.txt @ALL

Applying a WebSphere 7 Fixpack

This example is for windows, but for 'Nix it is much the same process
http://www-01.ibm.com/support/docview.wss?rs=180&uid=swg27014463#70011
We will have to go to fix central and download the latest FixPack


7.0.0-WS-WAS-WinX32-FP0000011.pak

To actually install the WebSphere Fixpack, it is required that the latest WebSphere update installer be used to apply the fix pack


Download update installer


=====================
Steps to apply Fix Pack 11 to WebSphere for Windows
Unpack the Fixpack (if required)
Install the latest version of the Update Installer


Accept License Agreement


The system prerequisite check will be run to ensure that the required environment is ready for an install


Select the appropriate installation directory


You will be presented with an installation summary click next


Click Finish as shown below


===============================

Applying the actual FixPack.
Before installing the FixPack, make sure that all the local WebSphere Services are not running.


Once run the Update installer will wish to know the root location of you WebSphere installation, ensure that it has guessed correctly.


Click Next and select Install Maintenance Package


You will be presented with the path to the maintenance packages, you can leave the default and copy in the fixpx.pk file to this location or browse for the actual fix pack.


I choose to move the downloaded pak file to the maintenance folder.


The following screen informs the user that The WebSphere profile will also be updated. Be mindful of other WebSphere feature packs,


In this case since I was using Windows 7 there was an issue with updating files?


Installation Complete


Update installation unsuccessful:
The following maintenance package could not be installed:
  • 7.0.0-WS-WAS-WinX32-FP0000011 - WebSphere Application Server 7.0.0.11 FixPack
on the following product:
  • IBM WebSphere Application Server
    C:/WAS7/AppServer

For more information, refer to the following log file:
  • C:\WAS7\AppServer\logs\update\7.0.0-WS-WAS-WinX32-FP0000011.install\updatelog.txt

Click Relaunch to reinstall or remove the maintenance package, or click Finish to exit the wizard.
Looking at the log...
19-Oct-2010 10:24:24), Install, com.ibm.ws.install.ni.ismp.actions.InstallNIFMaintenance, err, mkdirs failed for: file:/C:/WAS7/AppServer/systemApps/isclite.ear/isclite.war/WEB-INF/com.ibm.ws.console.sibws.sibusresources.wss/WEB-INF
(19-Oct-2010 10:24:24), Install, com.ibm.ws.install.ni.ismp.actions.InstallNIFMaintenance, err, The file systemApps/isclite.ear/isclite.war/WEB-INF/com.ibm.ws.console.sibws.sibusresources.wss/WEB-INF/web.xml could not be replaced.
(19-Oct-2010 10:24:24), Install, com.ibm.ws.install.ni.ismp.actions.InstallNIFMaintenance, err, com.ibm.ws.install.ni.framework.fileactions.NIFFileActionIOException: The file systemApps/isclite.ear/isclite.war/WEB-INF/com.ibm.ws.console.sibws.sibusresources.wss/WEB-INF/web.xml could not be replaced.
Windows popped up this dialog.


Solution

http://www-01.ibm.com/support/docview.wss?rs=1079&uid=swg21230924
Make the WebSphere Service Manual and restart the machine, and then re-try

=================================
Once installed it is a good habit to run versionInfo.bat
c:\WAS7\AppServer\bin>versionInfo.bat
WVER0010I: Copyright (c) IBM Corporation 2002, 2005, 2008; All rights reserved.
WVER0012I: VersionInfo reporter version 1.15.1.26, dated 8/9/08
--------------------------------------------------------------------------------
IBM WebSphere Application Server Product Installation Status Report
--------------------------------------------------------------------------------

Report at date and time 19 October 2010 11:39:08 BST
Installation
--------------------------------------------------------------------------------
Product Directory C:\WAS7\AppServer
Version Directory C:\WAS7\AppServer\properties\version
DTD Directory C:\WAS7\AppServer\properties\version\dtd
Log Directory C:\WAS7\AppServer\logs
Backup Directory C:\WAS7\AppServer\properties\version\nif\backup
TMP Directory C:\Users\SteveR\AppData\Local\Temp
Product List
--------------------------------------------------------------------------------
BASE installed
Installed Product
--------------------------------------------------------------------------------
Name IBM WebSphere Application Server
Version 7.0.0.11
ID BASE
Build Level cf111021.10
Build Date 5/27/10
--------------------------------------------------------------------------------
End Installation Status Report
--------------------------------------------------------------------------------

c:\WAS7\AppServer\bin>

Install MQ 7 Server Linux

CentOS 5.4 64bit WebSphere MQ install
WMQv700Trial-x86_linux.tar.gz - 23 bit MQ
tar -xvf WMQv700Trial-x86_linux.tar.gz
Accept License
./mqlicense.sh


-rw-r--r-- 1 root root 523107516 Apr 5 2009 WMQv700Trial-x86_linux.tar.gz
[root@localhost wmq7_install]# rpm -ivh MQSeriesRuntime-7.0.0-0.i386.rpm
Preparing... ########################################### [100%]
Creating group mqm
Creating user mqm
1:MQSeriesRuntime ########################################### [100%]

[root@localhost wmq7_install]# rpm -ivh MQSeriesServer-7.0.0-0.i386.rpm
Preparing... ########################################### [100%]

[root@localhost wmq7_install]# rpm -ivh ibm-java2-i386-sdk-5.0-5.0.i386.rpm
error: Failed dependencies:
libXp.so.6 is needed by ibm-java2-i386-sdk-5.0-5.0.i386
[root@localhost wmq7_install]# yum install libXp
Loaded plugins: fastestmirror
Loading mirror speeds from cached hostfile
* addons: mirror.ukhost4u.com
* base: mirror.ukhost4u.com
* extras: mirror.ukhost4u.com
* updates: mirror.ukhost4u.com
Setting up Install Process
Resolving Dependencies
--> Running transaction check
---> Package libXp.i386 0:1.0.0-8.1.el5 set to be updated
---> Package libXp.x86_64 0:1.0.0-8.1.el5 set to be updated
--> Finished Dependency Resolution
Dependencies Resolved
==================================================================================================
Package Arch Version Repository Size
==================================================================================================
Installing:
libXp i386 1.0.0-8.1.el5 base 23 k
libXp x86_64 1.0.0-8.1.el5 base 23 k
Transaction Summary
==================================================================================================
Install 2 Package(s)
Upgrade 0 Package(s)
Total download size: 45 k
Is this ok [y/N]: y
Downloading Packages:
(1/2): libXp-1.0.0-8.1.el5.i386.rpm | 23 kB 00:00
(2/2): libXp-1.0.0-8.1.el5.x86_64.rpm | 23 kB 00:00
--------------------------------------------------------------------------------------------------
Total 43 kB/s | 45 kB 00:01
Running rpm_check_debug
Running Transaction Test
Finished Transaction Test
Transaction Test Succeeded
Running Transaction
Installing : libXp 1/2
Installing : libXp 2/2
Installed:
libXp.i386 0:1.0.0-8.1.el5 libXp.x86_64 0:1.0.0-8.1.el5
Complete!
[root@localhost wmq7_install]# rpm -ivh ibm-java2-i386-sdk-5.0-5.0.i386.rpm
Preparing... ########################################### [100%]
1:ibm-java2-i386-sdk ########################################### [100%]

[root@localhost wmq7_install]# rpm -ivh MQSeriesJava-7.0.0-0.i386.rpm
Preparing... ########################################### [100%]
1:MQSeriesJava ########################################### [100%]

[root@localhost wmq7_install]# rpm -ivh MQSeriesClient-7.0.0-0.i386.rpm
Preparing... ########################################### [100%]
1:MQSeriesClient ########################################### [100%]

[root@localhost wmq7_install]# rpm -ivh MQSeriesSDK-7.0.0-0.i386.rpm
Preparing... ########################################### [100%]
1:MQSeriesSDK ########################################### [100%]

How to create a listener for a Message Queue

Sample: Queue Manager = QM_ORANGE


Run the message queue manager script command tool


[mqm@websphere2 ~]$ runmqsc
5724-H72 (C) Copyright IBM Corp. 1994, 2005. ALL RIGHTS RESERVED.
Starting MQSC for queue manager QM_ORANGE.


Create the listener


DEFINE LISTENER(qm_orange.listener) TRPTYPE (TCP) PORT(60000)
1 : DEFINE LISTENER(qm_orange.listener) TRPTYPE (TCP) PORT(60000)
AMQ8626: WebSphere MQ listener created.
start listener(qm_orange.listener)
2 : start listener(qm_orange.listener)
AMQ8021: Request to start WebSphere MQ Listener accepted.
end
3 : end
2 MQSC commands read.
No commands have a syntax error.
All valid MQSC commands were processed.


Check to see if the listener is running as a process


[mqm@websphere2 ~]$ ps -ef | grep qm_orange.listener
mqm 12809 12709 0 22:18 pts/2 00:00:00 grep qm_orange.listener


Check to ensure port is an open (any adapter i.e not bound to any specific adapter) listener


[mqm@websphere2 ~]$ netstat -an | grep 60000
tcp 0 0 :::60000 :::* LISTEN


Create Channel


The server-connection channel, called SYSTEM.ADMIN.SVRCONN, exists on every remote queue manager. This channel is mandatory for every remote queue manager being administered. Without it, remote administration is not possible.


You can create the channel using the following MQSC command:
DEFINE CHANNEL(SYSTEM.ADMIN.SVRCONN) CHLTYPE(SVRCONN)
This command creates a basic channel definition. If you want a more sophisticated definition (to set up security, for example), you need additional parameters.


[mqm@websphere2 ~]$ runmqsc
5724-H72 (C) Copyright IBM Corp. 1994, 2005. ALL RIGHTS RESERVED.
Starting MQSC for queue manager QM_ORANGE.


DEFINE CHANNEL(SYSTEM.ADMIN.SVRCONN) CHLTYPE(SVRCONN)
1 : DEFINE CHANNEL(SYSTEM.ADMIN.SVRCONN) CHLTYPE(SVRCONN)
AMQ8014: WebSphere MQ channel created.
end
2 : end
One MQSC command read.
No commands have a syntax error.
All valid MQSC commands were processed.

Friday, May 6, 2011

Export / Import LTPA-Keys for Single Sign On (SSO)

Sometimes its necessary to implement an SSO-Enviroment over different WebSphere-Cells (e.g. Production-Cell and Acceptance-Cell). To do this both cells need the same LTPA-Keys.
The synchronization of LTPA-Keys can be done over Admin-Console.

1. To Export LTPA-Keys from a Cell navigate to
Security > Secure administration, applications, and infrastructure > Authentication mechanisms and expiration.

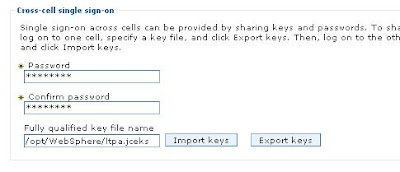
2. Fill out the import/export-Form at the bottom of the page
and click "Export keys". The LTPA-Keys will be exported to the specified directory. (The Keys will be password protected.)

3. Copy the exported ltpa.jceks-File to other the Cell (do not override ltpa.jceks of this cell).

4. Take a look at ltpa.jceks-File of this cell and note the file-size.
File is located in /"websphere"/"dmgr"/config/cells/"cellname"/ltpa.jceks

5. To import the LTPA-Keys to other Cell navigate to
Security > Secure administration, applications, and infrastructure > Authentication mechanisms and expiration.

6. Fill out "Cross-cell Single sign on"-From and click "Import keys"

7. File size of ltpa.jceks-File of this Cell should now be increased.
Sometimes nothing happens to file size of ltpa.jceks-File and Cross-cell SSO will not work (WAS-Bug).
In this case just repeat the import.

8. Restart servers/node

wsadmin rotate jvm log files

Simple, working, rotates logs at 10mb saving max 5 files.

# rotateWasLogEPRN.py
# Setup WAS Log file rotations
# for yourserver
#
# Implement:
# ./wsadmin.sh -lang jython -f $FILE_LOCATION/rotateWasLogEPRN.py >> $TO_LOG_FILE
#
# You can add this as you have other scripts in the deployment script
# if you need help please let me know.
#
#

print "Changing the SystemOut & SystemErr log file rotation settings"
var1 = AdminConfig.getid('/Cell:yourcell/Node:yournode/Server:yourserver/')

log = AdminConfig.showAttribute(var1, 'outputStreamRedirect')
log2 = AdminConfig.showAttribute(var1, 'errorStreamRedirect')

AdminConfig.modify(log, '[[rolloverSize 10] [maxNumberOfBackupFiles 5]]')
AdminConfig.modify(log2,'[[rolloverSize 10] [maxNumberOfBackupFiles 5]]')

AdminConfig.save()

print "New SystemOut settings 5-6-11"
AdminConfig.show(log).split("\n")
print "New SystemErr settings 5-6-11"
AdminConfig.show(log2).split("\n")

Quick hit JVM heap size change

if you tasked to change the JVM heap size in approximately 2,500 servers today.

#
# Update the Heap size
#
# ./wsadmin.sh -lang jython -f updateJVM.py
#

as = AdminConfig.getid('/Cell:YOUR_CELL_NAME/Node:YOUR_NODE_NAME/Server:YOUR_SERVER_NAME/')
jvm = AdminConfig.list('JavaVirtualMachine', as)
AdminConfig.modify(jvm, [['initialHeapSize', '512'], ['maximumHeapSize', "768"]])
AdminConfig.save()
# set the newly saved config to variables to place entries in logging
i = AdminConfig.showAttribute(jvm, "initialHeapSize")
m = AdminConfig.showAttribute(jvm, "maximumHeapSize")
print "The initial heap size is now" + i
print "The max heap size is now" + m

Of course, you can change the heap to whatever size you would like

Enable GZIP compression on HTTP server to improve response time

Enabling GZIP compression on the HTTP Server serving Lotus Quickr resources reduces the amount of content that has to be downloaded and improves response times. To do so, use these steps:
1. Stop the Apache server (on your Web Server)

2. Edit the httpd.conf file

3. Append the following to the end of the file:

# compress everything but images
LoadModule deflate_module modules/mod_deflate.so
DeflateFilterNote Input instream
DeflateFilterNote Output outstream
DeflateFilterNote Ratio ratio

# log some info
#LogFormat '"%r" %{outstream}n/%{instream}n (%{ratio}n%%)' deflate
#CustomLog logs/deflate_log deflate

# Insert filter
SetOutputFilter DEFLATE

# Netscape 4.x has some problems...
BrowserMatch ^Mozilla/4 gzip-only-text/html
# Netscape 4.06-4.08 have some more problems
BrowserMatch ^Mozilla/4\.0[678] no-gzip
# MSIE masquerades as Netscape, but it is fine
BrowserMatch \bMSIE !no-gzip !gzip-only-text/html

# Don't compress images SetEnvIfNoCase Request_URI \\.(?:gif|jpe?g|png|exe)$ no-gzip dont-vary

4. Save the file

5. Restart the Apache server

Enabling Verbose Garbage Collection verbosegc on releases of Version 6.0 and 6.1 of WebSphere Application Server

In the Administrative Console, expand Servers and then click on Application Servers.


Click on the server that is encountering the "OutOfMemory" condition.


On the Configuration tab, under Server Infrastructure, expand Java and Process Management, and click Process Definition.


Under the Additional Properties section, click Java Virtual Machine.


Select the Verbose garbage collection check box.


Click Apply.


At the top of the Administrative Client, click Save to apply changes to the master configuration.


Stop and restart the Application Server.


If you wish to add extra JVM parameters read below:


The verbose garbage collection output is written to either native_stderr.log or native_stdout.log for the Application Server, depending on the SDK operating system as follows:


For AIX®, Microsoft® Windows®, or Linux®:

native_stderr.log


For Solaris™ or HP-UX:

native_stdout.log


Notes:

For an HP-UX system, add the following parameter to the Generic JVM arguments on the Java Virtual Machine Settings page:


-Xverbosegc:file=<name>


Where <name> is a valid fully qualified filename.


For a Solaris system, add the following parameters to the Generic JVM arguments on the Java Virtual Machine Settings page:


-XX:+PrintGCDetails -XX:+PrintGCTimeStamps -XX:+PrintHeapAtGC


The -XX:+PrintHeapAtGC parameter will generate a large amount of logging to the native_stdout.log file. Ensure there is adequate file system space when enabling this option.


If you make changes to the JVM parameters you must restart the Application Server.
------------------------------------------------------------------


Enabling verbosegc on Version 6.0 Deployment Manager

Open the Administrative Console.


Expand System Administration.


Click Deployment Manager.


Expand Java and Process Management.


Click Process Definition.


Click Java Virtual Machine


Select the Verbose Garbage Collection check box.


Click OK.


Click Save. The parameters will take affect at the next Deployment Manager restart.


If you wish to add extra JVM parameters read below:


For an HP-UX system, add the following parameter to the Generic JVM arguments on the Java Virtual Machine Configuration page:


-Xverbosegc:file=<name>


Where <name> is a valid fully qualified filename.


For a Solaris 1.4 JVM system, add the following parameters to the Generic JVM arguments on the Java Virtual Machine Configuration page. This applies to releases of WebSphere Application Server V5.1 and higher:


-XX:+PrintGCDetails -XX:+PrintGCTimeStamps -XX:+PrintHeapAtGC


The -XX:+PrintHeapAtGC parameter will generate a large amount of logging to the native_stdout.log file. Ensure there is adequate file system space when enabling this option.


If you make changes to the JVM parameters you must restart the Deployment Manager.
---------------------------------------------------------------


Enabling verbosegc on Version 6.0 Node Agent

Open the Administrative Console.


Expand System Administration.


Click Node Agents.


Click on the Node Agent.


Expand Java and Process Management.


Click Process Definition.


Click Java Virtual Machine.


Select the Verbose Garbage Collection check box.


Click OK.


Click Save.


Click Save. The parameters will take affect at the next Node Agent restart.


If you wish to add extra JVM parameters read below:


Notes:

For an HP-UX system, add the following parameter to the Generic JVM arguments on the Java Virtual Machine Configuration page:


-Xverbosegc:file=<name>


Where <name> is a valid fully qualified filename.


For a Solaris 1.4.X JVM system, add the following parameters to the Generic JVM arguments on the Java Virtual Machine Configuration page. This applies to releases of WebSphere Application Server V5.1 and higher:


-XX:+PrintGCDetails -XX:+PrintGCTimeStamps -XX:+PrintHeapAtGC


The -XX:+PrintHeapAtGC parameter will generate a large amount of logging to the native_stdout.log file. Ensure there is adequate file system space when enabling this option.


If you make changes to the JVM parameters you must restart the Nodeagent.


References:
http://www-1.ibm.com/support/docview.wss?rs=180&uid=swg21114927

Thursday, May 5, 2011

Setting session time outs in WebSphere

There are two main ways that sessions can be set in WebSphere.
1. For the entire server default = 30 mins
Server Panel:
Application servers > [Server Name] > Session management


or
2. For a specific deployment (application)
Application Panel:
Enterprise Applications > [Application Name] > Session management

Installing a WebSphere Application Server 7 profile

By running the <websphere_install_root>/bin/pmt.sh tool you can create an application server profile.


Click "Create" button to start the profile creation wizard


It is recommended that you use the advanced profile creation, as this will give you more choice. If you use the Typical profile creation option the wizard will give default settings and names to nodes and cells and you may not want this.


You need to deploy the administration console if this is your management server otherwise you have no GUI way to administer the Application Server.

It is useful to deploy the default application, the snoop servlet is great for testing IHS and Workload Management.


I personally like to ensure that all profile are saved to the profiles folder or even a completely independent file system or set of folders not in the same path as the install binaries. This makes it easier to manage profiles and remove them if unwanted.

I also made this the default profile which means that when you run the wsadmin tool you do not need to specify the profile you wish to use, it will use this profile by default.


I find it good that you use node names that are human readable, however if you environment is going to have many WebSphere nodes, then use an intelligent naming scheme.


It is recommended that you implement Administrative security. Remember that you need to edit soap.client.props in the <wwebsphere_install_root>/profiles/<your_profile>/properties and add the password you have set here.


You can import an existing SSL cert or just use a self cert.


If you generate a self signed cert and this server is just for testing I would probably increase the certificate to 15 years so you don't have to worry about it expiring, however now with WebSphere 7 SSL is so much easier to administer.


Because I had installed the management profile first,the ports have to be changed, this all depends on what profiles have been installed before.


Sometime I like the Linux service to be installed,this is a development machine so I don't mind root being used. Consider running WebSphere as a non-root user once installed. Best to install as root then chown to another user for runtime.


In this case I want to control manually my web Server definitions. These can be created later in the Administrative console. Web Server definitions are for IHS (IBM HTTP Server) and are often used to workload management and load balancing.


Summray, click "Create"


Click finish to close, don't need to launch first steps console


./startServer.sh server1

http://<www_your_domain.com>:9061/ibm/console

Note: The administrative port is 9061 in my screen shots,but normally 9060 by default.

I found that if you don't enable the SSL port in the firewall then the console cannot redirect to port 9043 which is the SSL port for the administrative console. if you go to port 9060 then it wants to redirect to 9043 or in the example above 9061 wanted to redirect to 9044.